|
Time Delay Though the Starling-2020 measures well, she is not time-aligned. To achieve this, I will have to delay the tweeter so that both the tweeter and the woofer reach the microphone at the same time. To determine this delay, I use Room EQ Wizard (REW). This is a very powerful free software that I find invaluable in designing speakers. There is a special feature in REW that allows the user to do time alignment. But before I proceed further, the system must be connected as shown in Fig 1.
The first step is to ensure the tweeter and woofer crossovers are separated. The Left Out of the power amplifier is then connected to the tweeter crossover and the Right Out to the woofer crossover. The Left output from REW is wired to the Left input of the power amplifier and the Right out to the Right in. Once the system is wired up properly, the next step is to configure REW for delay measurements. Room EQ Wizard (REW)Click on Preferences then Analysis and at the bottom right corner, select No Smoothing. This is very important otherwise the delay measurement won’t be accurate. After that, click on the Measure button and set it as in Fig 2.
At top left, select Use acoustic timing reference. This is necessary because I’m using my OmniMic USB microphone. In acoustic timing, a short beep will be emitted before the sweep. REW will use this beep as a reference to calculate the delay. I then set the Start Freq at 2,200Hz and ends at 2,700Hz. There is no necessity for 20Hz to 20kHz because my tweeter crossover is at 2,500Hz. Lastly, select Left channel for the Timing Reference Output. In the other box, select Left too. Click Start Measuring button and you’ll hear a short beep followed by a sweep emitting from the tweeter. The beep is the timing reference that REW will use to measure the delay. To measure the delay of the woofer, leave the Timing Reference at Left and select the box beside it to Right. Make another sweep. This time, the sweep will emit from the woofer. Needless to say, your calibrated microphone should stay at tweeter’s axis, one meter away. No movement is allowed for the microphone and the speaker.
After these sweeps, the delays are shown in the Left of the REW screen. The Violet plot in Fig 3 is my Morel MDT29 tweeter with a delay of 0.25 ms. Below it is my ER18 with a delay of 0.31 ms. Subtracting the two, the ER18 is behind the tweeter by 0.06 ms. Expressing in distance, 0.06 ms is 20.58 mm (0.81 ins). This piece of information is crucial. With it, I can install a lattice network to delay the tweeter by 0.06 ms. Alternatively, I can use a step with a thickness of 0.81 inch on my woofer. Both options will work but in today’s exercise, I shall use a delay network.
Fig 4 is a graphical representation of the delays. To get this display in REW, click on OVERLAY in the Main Menu then IMPULSE. The RED plot is my tweeter and the Green is the woofer. The distance between the two peaks at 100% is 60 microsec. This is exactly what is display in Fig 3 (0.06 ms). Lattice Delay NetworkAfter I determined the delay time, I’m ready to install a lattice network on the tweeter. Fig 5 shows what a delay network looks like. It’s only 2 capacitors and 2 inductors.
With some trial and error, I found L=0.22mH and C=4uF are the values that time-align the Starling-2020. In Fig 6, both the MDT29 and the ER18 now have the same delay of 0.29 ms.
When viewed under IMPULSE in the OVERLAY, the tips of the two plots coincide exactly at 290 microsec (Fig 7). That’s 0.29 ms shown in the information panel (Fig 6). Verifying with a Null
Fig 8 is the Null response of the Starling-2020 with the Delay network added to the tweeter. The notch depth is about -20dB. Not too shabby for a passive delay network. This is a huge improvement over one without delay. In that, the null is completely absent.
The Black plot in Fig 9 is the Starling-2020 crossover passband. It shows a very clean summation from 1.5kHz to 5.5kHz. No cancellations are observed within the passband. Sound of the Starling-2020TAI’m glad I decided to take the Starling-2020 one step further with the time-alignment. The music sounds more refined and natural now. All it took was two inductors, two capacitors and a bit of extra work. She can’t get any better than this. Unless otherwise stated, all measurements were made with the mic at 36 ins, tweeter axis. Impulse Window=5ms. No smoothing applied. |

November 6, 2020Articles, HIFI DRIVERS, Projects
 Fig 1 – System setup for measuring delay
 Fig 2 – Settings for Delay Measurement
 Fig 3 – Delay of Seas ER18RNX
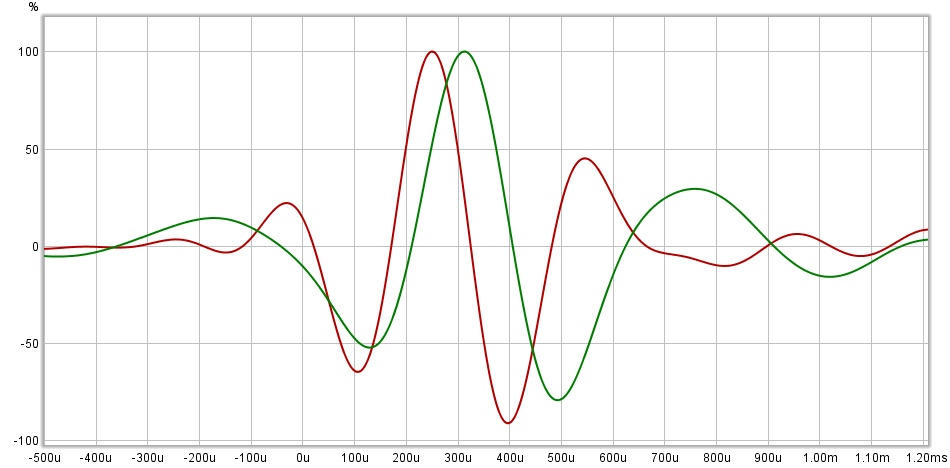 Fig 4 – Tweeter and woofer delay
 Fig 6 – MDT29 and ER18 same Delay
 Fig 7 – Starling-2020 tweeter and woofer alignment
 Fig 8 – Null Response with Tweeter Delay installed
 Fig 9 – Crossover Passband